

Source: Designed with canva
So you’ve bought a personal weather station! Now you have to figure out how and where to mount it. Don’t take this step lightly, a cheap mount won’t withstand harsh weather conditions over an extended period, and correct siting is going to make all the difference in obtaining readings that rival nearby official weather stations.
We’ve compiled this guide to help you find a mounting solution and site your weather station correctly. Where possible, we’ve used guidelines from official observer programs. These guidelines will help make your home weather station as accurate as possible.
If you haven't decided which weather station you're going to purchase, it may help to read our home weather station reviews here first. You will want to choose a station beforehand so you can select the appropriate mount that accommodates your specific model.
Our team of editors independently research, test, and recommend the best products to help you navigate when shopping online. This post contains compensated links, and if you make a purchase using the links included, we may earn a commission. To learn more, read our disclaimer.
Weather Station Siting Instructions
For siting your weather station, we strongly recommend you follow the guidelines from the National Weather Service's Citizen Weather Observer Program (CWOP). It’s likely that you won’t be able to meet all the suggestions here, but try to get as close as possible and remember to keep the sensors inside the wireless range of the console.
- Temperature/Humidity Sensor: Place on level ground, over a natural surface inside a radiation shield at eye level (in between 4’1” and 6’7” above ground). Ideally at a horizontal distance of at least two times the height of any nearby obstructions (e.g., 40 feet away from a 20-foot tall tree) and well away from any sources of artificial heat (concrete, roofs, chimneys, rocks, metal fences, etc.).
- Anemometer: Mount at the height of 33 feet above ground level, and ideally at a horizontal distance of 10 times the height of the nearest obstruction. If you mount the anemometer to the side of a mast rather than the top, the anemometer should be placed at least three times the diameter away from the main mast (e.g., 6” away from a 2” diameter mast).
- Rain Gauge: CWOP recommends that the rain gauge is mounted at the height of 4-6 feet above the ground. It should ideally be positioned at a horizontal distance of at least four times the height of any nearby obstructions. Also, ensure the gauge is level, and at a location where splashback from the ground and other surfaces cannot occur.
- All-In-One Sensor Suites: If you have a station with an all-in-one sensor suite, you will have to make a compromise between the ideal height of the anemometer (33 feet) and temp/humidity/rain sensors (4-6 feet). The best option is to go somewhere in between, 10 feet or higher is recommended.

Weather Station Mounting Ideas For Rural Areas
As your home or business is in a rural area, you will probably have the space to keep your station well away from any structures, so make use of the land. You’re also less likely to have landowner covenants or Homeowners Association rules to abide by. Place the anemometer on top of a tall mast at 33 feet and the temperature and humidity sensors further down the pole at eye level. If you have an all-in-one station, you can use a much shorter mast so that your temperature and rainfall readings are accurate.

This installation is about as ideal as you can get. The anemometer is at 33 feet, while the rain gauge and the temperature sensor is at 5 feet above ground level on an even surface. The guy wires are essential for masts of this height.

All-in-one sensor units will force you to make a compromise between the ideal height of the anemometer and temp/humidity/rain sensors. It's best to go somewhere in between. This Davis Vantage Vue appears to be 10 feet high which is an acceptable compromise.

The anemometer is at 21 feet here, it's short of the recommended 33 feet, but it's still at a reasonable compromise height. The user has cemented the posts and attached a galvanized metal pole. The sturdy mount doesn't require any guy wires at this height.
Weather Station Mounting Ideas For Suburban Areas
It will be much more difficult to mount a tall mast in a suburban area. Instead, use the structures around you to your advantage. Many homeowners install their weather station on top of their roof or on the eaves using tripods or side mounts. Do not mount it too close to the surface of the roof. It must be well above the roofline—preferably by as much as 10 feet—so there is no interference with the readings. If you are mounting the weather station to your house or another structure, be sure to run a ground wire.

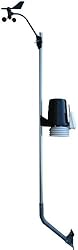
An Ambient Weather WS-2902 is pictured here with the EZ-30-12 mounting kit. This is a great location to mount a weather station, but it's just too close to the roof. The unit needs to be raised with a mast extension to reduce the roof's impact on the readings.

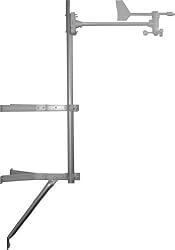
Antenna masts are a good alternative for mounting a weather station. These eave cross mounts will prevent you from having to drill into the roof. The Davis Pro2 sensor unit pictured on the left needs to be separated from the anemometer and placed lower to the ground at eye level. While both of these installations are technically too low, the anemometer on the right is at a reasonable compromise height.

This anemometer installation is set up on a tripod with a tall mast at an ideal height, well clear of any obstructions. Investing in guy wires might be worthwhile to reduce any sway.
Weather Station Mount Brands
There are a variety of companies that manufacture mounting kits which can help with the placement of your weather station. Amazon has an extensive range of options on display. We were even able to find mounts for TV antennas (which often work as well). Our recommendation, however, is to use mounts from Ambient Weather. Unlike the TV antenna mounts, Ambient Weather’s are built specifically for use with personal weather stations, and they are of exceptional quality—some TV antenna mounts are flimsy in comparison. They also have several different types of mounts to choose from including tripods, poles and side mounts.
Whatever weather station mounting kit you select, make sure the mast is the correct diameter for your specific station. Ambient Weather and Davis weather station's will fit on the mounts listed below that are 1.25 inches in diameter, while AcuRite weather stations will require the 1 inch diameter mounts. You should be able to find the appropriate pole diameter in your owner’s manual.
Tools and Materials
Any weather station mounting solution you purchase should be made of steel or aluminum, as these will withstand harsh weather conditions the best. Stay away from plastic mounts as they’re the least durable. If you’re planning to make your own mount, using PVC piping is a good alternative if you cannot use a galvanized metal pole. Some people attach their weather stations to a 4x4 lumber post—just remember to treat the wood with some type of water resistant sealant to prevent rot.
Have a screwdriver, adjustable wrench, compass, and drill handy. A bubble level is also useful to have as well, so you can ensure your rain gauge is level. Many smartphones have both a compass and level built in, or you can download an app to help out.
Weather Station Mounting Solutions
There are several different types of home weather station mounts, and which one you use depends on personal preference and your desired mounting location. We’ve listed some of the more popular solutions below from Ambient Weather.
Make sure you order the correct diameter for your weather station to mount the sensors properly!
Tripod Mounts
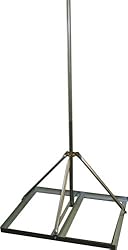
This type of mount is best for mounting on the ground or a flat surface such as the flat part of a roof. Ground stakes or screws can be placed through the holes on the tripod legs in the EZ-48, on the other hand, the EZ-NPP has a platform that allows it to stay in place with concrete cinder blocks. The EZ-48 out of the box has a height of 53 inches but can support two extensions to bring it to 115 inches in height. While out of the box the EZ-NPP has a height of 66 inches, extendable to 128 inches with two additional mast extensions.

Side Mounts
If mounting on the ground is not an option, a side mount to install the station on the side of your home is another solution. The EZ-30-12 mounts to a vertical wall, chimney, eve, or fence post and is the lower-cost option, but if you need a bit more flexibility and have the funds, consider stepping up to the WeatherMount2 which is adjustable, allowing it to be installed in a variety of locations including flat, pitched, and vertical surfaces. Just be sure to stay clear of any obstructions, and add extensions to reach the recommended height.
Chimney Mount
If you don’t want to drill into your roof and can safely access your chimney, consider Ambient Weather’s EZ-29-24 Chimney Mount. This mount includes straps which are placed around the chimney, offering a high degree of stability. It is even compatible with Ambient Weather's mast extensions, enabling you to sufficiently clear your chimney and roof for the most accurate readings.
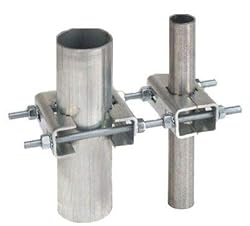
Poles/Mast-To-Mast Mounts
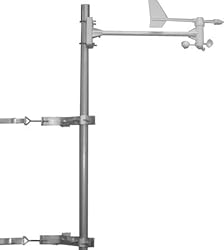
If you’d like to create a more custom solution, you might want to consider the EZ2-35W2MC weather station mounting pole. It is two masts that combine for an effective height of 68 inches with additional clamps to mount it to a vertical surface. If you have a pole in your backyard already, use the EZ2-35W2MC with Ambient’s EZ-HD-PTP mast-to-mast mount. Ambient Weather recommends purchasing two of these mast-to-mast mounts to ensure stability, a recommendation we will also make as well. If you use a pole solution that reaches over 10 feet in height, consider investing in guy wires to decrease sway.

Accessories
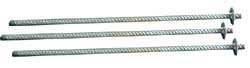
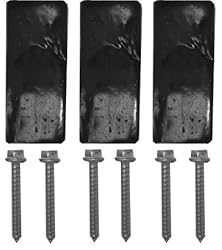
For any of the station mounts that allow for extensions, order the EZ-125-35M from Ambient Weather to increase the station height. Not all of Ambient Weather’s mounts are compatible, so double check before you make an order. Use the ground stake kit to hold the EZ-48 tripod in place if you're mounting it on top of your lawn. The EZ-46-3 tar pad kit can be attached to the legs of the EZ-48 tripod for roof installations to prevent leaks.
Homemade Mounts
If you are super handy, there’s a wide variety of materials from a home improvement store that you can use to mount your station, including fence posts, 4x4s, galvanized metal poles, PVC pipes and so forth. These require some degree of handiwork but can be a low-cost solution if done right.

An Ambient Weather WS-2902 on a PVC pipe which is attached to a sturdy fence post. This setup is an excellent example of a low-cost homemade installation. The unit is well away from any obstructions, and the height is ideal for an all-in-one sensor suite.

This AcuRite weather station owner has used PVC pipe and fittings to mount the unit to the roof. Unfortunately, it is installed too close to the roofline. The roof shingles will affect the temperature readings at this height. The tree in the background is also a wind obstruction and will interfere with the measurements, but as noted earlier you will have to do the best job you can with the resources you have available.

The anemometer on this installation needs to be raised considerably higher with a pole. At the current height, the wind speed measurements will read a lot lower than official weather stations. Otherwise, the sensor unit is at the correct height, and the post looks sturdy and level.
TV Antenna Mounts
While you can use TV antenna mounts to install your station, most of these models will be similar to the Ambient Weather mounts that we talked about above but can vary widely in quality. If you decide to use an antenna mount be sure to choose a model with a heavy duty construction. We recommend using the Ambient Weather mounts as you have better assurance of a quality product, and generally antenna mounts will cost just as much as comparable weather station mounting kits.
Final Thoughts
Mounting your home weather station using one of the above solutions, and carefully following our guidelines on how to site your station will ensure your readings are as accurate as possible.
Remember to keep your station accessible so you can keep it clean, perform any maintenance and replace the batteries when necessary. If you’re mounting a metal mast on a structure, make sure to run a ground wire for added safety in case of a lightning strike. Lastly, when installing your station and working at height, make safety your number one priority. Don’t take any unnecessary risks!


Hi Ed, Ive always liked all your articles … Great Reporting !